Homeblended Diet Basics

All content on this blog is for informational purposes only. If you use any of this information — you do so with this website’s encouragement to communicate with licensed medical professionals when making decisions about your health, presumably having done your own research, and in full knowledge of this website’s policies. Also, this page may include affiliate links. At no cost to you, I may receive a commission if you make a purchase using an affiliate link on this page.
The only thing more natural than a homeblended diet is to eat food you know is good for you without putting it in a blender first. With guidance of a knowledgeable dietitian, blenderized diets can be one of the healthiest options for those in need of a feeding tube. And what better way to progress on our adventures with our children to overcome the limits of Trisomy 18 than to grow optimally with the help of whole food?
Want to know more? Keep reading to learn how my daughter Aubby gained her gtube, our journey to homeblending, and some blended food basics to help you get started.
In the NICU…
A gtube was our ticket home from the NICU. Without it, our daughter didn’t have the stamina to eat enough in a typical amount of time to maintain her energy levels and gain weight. The long and short of it is that we were told that she would need a gtube to go home.
I did object, at first. The NICU doctor had told me she wasn’t capable of bottle feeding, and she proved it wrong. Then he said she wasn’t capable of nursing, and she took to that better than the bottle.
When I was told she was “failure to thrive” and that she wouldn’t make it past such-and-such amount of time, I rebelled. I demanded she and I be returned to our room in the NICU from the step-down floor so we’d have quiet space to determine whether she could support herself if I breastfed her.
Two things ended that two-day standoff between me and the NICU doctor: 1, he failed to inform me that babies have a time when their red blood cells mature and it was that weekend they did so and weakened her; and 2, because of the red blood cell turnover, she was weakened which led to not enough intake so that she required a blood transfusion anyway.
Wisely, I called a draw on Day 2. I wasn’t wrong. I just didn’t know a transfusion was coming either. I felt I’d failed my baby…
But in retrospect? The NICU doctor’s naysaying wasn’t useful. But! A gtube was the best thing for her. After she was released from NICU at 7 weeks, it took until she was 5 months old for us to learn our nursing relationship efficiently.
When it was time for nursing to end – she chose to self-wean at 13 months – a whole new world of feeding her took its place.
Aubby’s Tube Feeding Journey
Our nursing/pumping relationship lasted her first year of life until she self-weaned. Since that time, Aubby’s food journey has moved from
- Breastmilk (age 0 to 13 months)
- also practicing oral solids (age 7 months to present)
- Similac Alimentum RTF (age 13 to 15 months)
- Compleat Pediatric (age 15 to 22 months)
- Nourish and Real Food Blends (age 22 to 25 months)
- blenderized diet (age 25 months to present), also known as homeblending or syringe feeding
You can find out more about Aubby’s food journey in her birth story and in my discussion of the merits of not shaking breastmilk. For our family, a blended diet has offered the greatest benefits, and in retrospect would’ve been the best option following weaning from breastmilk.
Before You Homeblend
Consider the cons:
- Prep takes time and is an investment.
- You “become the pump” and must learn your child’s digestive rhythm so as not to feed them too fast.
- Not covered by insurance.
- Hospital admissions may be complicated if there is resistance to a real-food diet.
- There is less equipment, but a cooler is essential for storing blended food containers/syringes.
Consider the pros:
- Easier to control exposure to allergens.
- Reflux symptoms/frequency often resolve in part or entirely.
- Better weight gain.
- Better exposure to real flavors and varieties of food, which can encourage interest in eating by mouth.
- If you choose syringes, that incessant, high-pitched feeding pump beeping no longer haunts your dreams.
- Highly portable.
Online blenderized diet resources I recommend include:
- (Facebook group) Blenderized RN
- (Facebook group) Nutritional Blends for Tubies
- Crunchy Tubie Mama
Two good homeblending books I know from the blending groups and from my daughter’s former dietitian include:
- Homemade Blended Formula Handbook
- Complete Tubefeeding: Everything you need to know about tubefeeding, tube nutrition, and blended diets
Questions to consider before syringe feeding:
- Would your child’s digestion allow for a bolus/syringe feeding approach?
- Does your child’s care team have a supportive and knowledgeable dietitian on board?
- Have you discussed what vitamins are needed based on dietary tolerances?
- Is allergen management reasonable for your goals?
Getting Started With Homeblending Tubie Foods
Blender For Homeblending
For homeblending, I would start by contacting the websites for the Vitamix Blender and/or the Blendtec Blender (I couldn’t find any application for Blendtec’s “All the Difference” information, so would just contact directly to ask) about their medical discount availability. My family was able to get a Vitamix discounted to about $175. So to begin with, you will need the best blender you can get — a Vitamix or Blendtec (or in a pinch a Ninja) are what can get blended food through a tube efficiently.
Syringes For Homeblending
Once you have the blender, you will need syringes – good syringes. The best syringes are called “Miracle” syringes, unless you prefer to use other equipment or to bolus feed. Miracle syringes come from a wildlife rescue site, but they are so far superior to other syringes a DME might provide. Miracle syringes save hands from aching, and they last a long time if treated well.
Tubing For Homeblending
I know there are adaptor tips that allow direct feeding, but I still haven’t personally been able to track them down. However, rather than Y-tubes (which allow for liquid medicines to also be given through the small port or crushed and dissolved through the large port), my family uses 12” 90-degree bolus tubes from NewLeaf Home Medical for feeds.
Travel Gear for Homeblending
My husband’s the utility tool guy, and occasionally experiments with different packing methods for Aubby’s equipment. Previously, our need was for a portable warmer for breastmilk, and we would fill a Yeti Cup or Ozark Trail tumbler with hot water for that purpose (and can also be repurposed to warm syringes). Most recently, our most successful/convenient setup is a small cooler (we use an Ozark Trail 12-can Cooler) with blue ice freeze packs. And the cooler has enough pockets that it doubles as a mini diaper bag, and can carry a small amount of tubing and a pre-drawn medication too!
Basic Homeblended Diet Recipe
The following recipe is my daughter’s basic blended diet recipe (or Nourish and/or Real Food Blends would still work in a pinch, if your child uses or might need to use one of those).
Due to her food intolerances, this basic recipe is corn-free (FYI for those who are corn intolerant – Aubby is middling “corn moderate”), gluten-free, dairy-free, low sodium, and does not include berries. She is also chicken and beef intolerant, so we use fish (or we recently found she tolerates lamb).
Ingredients List
- 2.5 cups Aroy-D coconut milk
- 4 oz (1/2 cup) meat (but no more than twice per week for fish)
- 1 cup Royal Basmati rice (burlap sack)
- 1 cup peas
- 2 medium carrots (raw)
- 1 cup baby spinach
- 1 apple
- 1 banana
- 1 avocado
- 4 tbsp Simply Nature milled flax seed
- 1 tbsp chia
- 1-2 tbsp local honey
- 2 tbsp molasses
- 1/3 tsp sea salt (Celtic grey mixed with/or pink Himalayan)
Then we choose two of these three options to help with bowel movements:
- 2 one-inch-wide slices of cantaloupe
OR
- ½ can plain pumpkin + 2 stalks of celery
For variety, any part of this list can be swapped with a food of the same type (Ex: meat, fruit, veggie) and equivalent amount.
And since you’ve added salt for electrolyte balance (super important), don’t forget! After the bulk is fully blended, on a low pulse setting add in your favorite multivitamin too! We like Naturelo brand and use the Prenatal version since it has better B-vitamin support, includes the only iron supplement our corn-intolerant kiddo’s ever tolerated, and iodine that she needs since corn derivatives are in regular/iodized salt. The adult dose is 3 caps, but reducing to 2 caps is comparable to their Children’s Chewable version.
Yield: Approximately 70 oz, or about 35 two-ounce syringes.
How To Blend

Before blending, be sure to prepare food as you would eat it. Frozen foods should be cooked normally. Large items should be chopped and chunked. Meat should be cooked thoroughly. If it’s leftovers, take into consideration the time it’s already been in the fridge. If it’s something you would cook, then cook it.
When you’re ready…
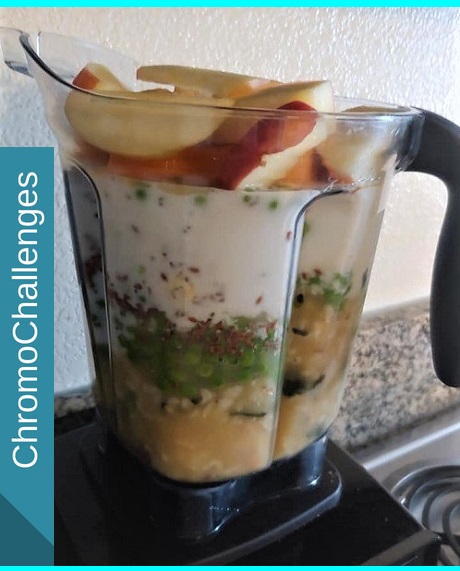
- Do not put hard, chunky food or meat at the bottom of your blend.
- Soft foods like quinoa, lettuce, and other soft veggies are good to put in first.
- When your blender container is filled, add your chosen liquids until they are even with the top of your ingredients.
- Double check that the lid to your blender is absolutely secure, or you will be wearing the blend.
- Pulse the blender a few times, and slowly increase speed. Yes, these high-powered blenders do sound a lot like lawnmowers.
- Unlike my husband who’s awesome in the kitchen, I just set a timer for my blends to blend for 2-1/2 to 3 full minutes before I slow it back down.
- If blend is very thick, gradually add just enough water to thin the blend until it is tube friendly.
- Fill syringes and/or put your blend into a storage container to be put in your refrigerator.
- The blender container is far easier to rinse and wash clean if you immediately transfer your blend, so clean your blender so it’s ready to go for next time.
Storing Homeblended Food
My favorite brand of storage containers are Pyrex storage containers. They clean up easy and are refrigerator friendly.
A good option for freezing blends is Reditainer Extreme Freeze Deli Food Containers with Lids. Just don’t use tape on the top of them, the top peels from the adhesive, but Sharpie marker directly used on top of the lid is fine and washes off with warm dish water.
What Comes After Learning To Homeblend?
I imagine that mastering homeblending your kiddo’s meals eventually goes one of two ways…
One way might be that they remain tube dependent – and there’s nothing wrong with that. There’s certainly nothing wrong with providing your child a nutritious diet that’s REAL and not dependent on corn or rice syrup fillers. And yes, you CAN learn how to blend, and blend well. And your child will grow under your care.
The other possibility is that your child develops the skills needed to swallow safely, navigate food items, and learns eating skills that lead to some oral intake. If this sounds like you or where you’re heading, I recommend joining Growing Independent Eaters to apply for their tube weaning program – an intention my family has for our daughter once we can save up for the consultation, and program if accepted.